Alpha Cloud - Alpha Anywhere Developer's Guide
Advanced Publishing Support in Alpha Anywhere
The Alpha Cloud advanced settings dialog (shown below) gives you more control over the configuration of your web sites and deployments, as well as options for managing security applications, server groups and certificates.
- You will need to create an application before you can publish to it.
- You must create a web site before you can deploy to it.
- A deployment schedule will be created automatically if you choose to deploy.
Here is how to create your publish settings for Alpha Cloud using the advanced settings dialog:
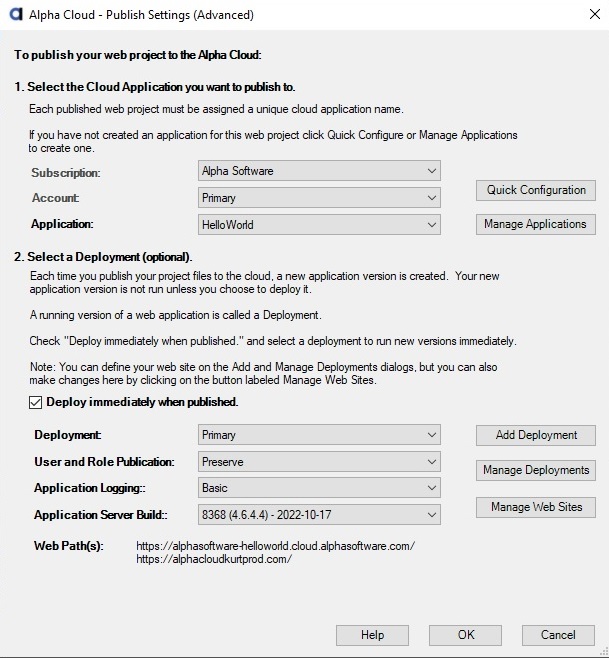
Select the subscription you want to publish to. If you only have access to one subscription, it will already be selected for you.
Select the account within the selected subscription you want to publish to. If you only have access to one account within that subscription, it will already be selected for you.
Select the application you want to publish your web project to. If you have not created an application yet, click the button entitled 'Manage Applications' to create an application. For instructions on creating your application see Managing Applications.
You may or may not want to deploy immediately when you publish.
- If you do not want to deploy immediately, uncheck the box entitled "Deploy immediately when published".
- If you want to deploy immediately check the box entitled "Deploy immediately when published".
- Select the deployment you want to publish to.
- If you don't have any deployments defined, click the button entitled "Add Deployment" to create one.
- If you have any deployments defined, but want to make changes, click the button entitled "Manage Deployments".
- Note: Web sites are assigned when creating or managing a deployment. If you want to make changes to a web site that is already assigned to your deployment, click the button entitled 'Manage Web Sites".
Set the User and Role Publication Option.
The security information for your web project includes initial users and groups you want to publish as well as page permissions.
- The first time you publish your application, you will want to include users and groups.
- After that, you will probably only want to publish page permissions.
The default option of "Preserve" will only publish users and groups if they have not been published for your application previously.
Options for publishing Users and Roles are:
- Preserve - Publish only if no users or roles are found.
- Ignore - Do not publish users and roles.
- Merge - Add new users and roles.
- Replace - Replace all users and roles.
- Merge Roles - Add new roles.
- Replace Roles - Replace all roles.
Set the level of logging detail you want to have created.
This option controls the amount of information captured for each web request. An application performs better with minimal logging, but you may need to collect more detail for debugging purposes.
The default option of "Basic" will capture minimal information, including errors.
Options for logging are:
- None - Turns off all logging (most efficient).
- Basic - Minimal data will be collected, including errors.
- Diagnostic - Enables basic logging plus additional diagnostic information.
- Complete - Detailed logging is enabled for both Xbasic and IIS.
- Debugging - Detailed logging is enabled for both Xbasic and IIS. Detailed error information is returned over the web.
Select the Alpha Anywhere Application Server version and build number you want to run for your server.
Note: The drop down list has options to select the current (released) and the current pre-release builds. Once you save your profile, these numbers will be saved with your profile. Alpha Cloud will never change the version and build number without you choosing a new one, as this could cause unexpected issues with your running application.
Click OK to save your settings.
Note: To save some steps, you can click on the button labeled Quick Configuration. The dialog below will let you create your application, one or more deployments, web sites, and security applications with a single click.
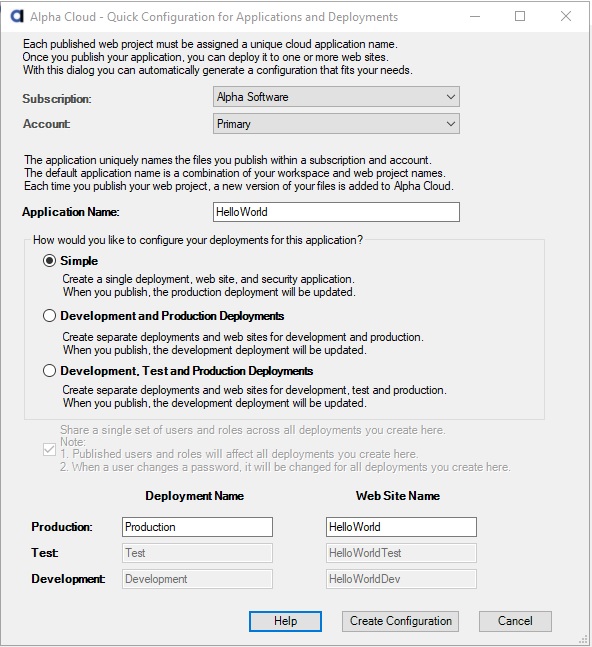
The application name defaults to a combination of your workspace and your web project names. This makes sense because a web project is published to the application each time you make changes. With few exceptions, you only need a single publish profile for each application being published to Alpha Cloud.
- Select Simple to create a single deployment, assign it to the root of a web site, and create a single security application.
- Select Development and Production Deployments to create a deployment for development and a deployment for production.
Each time you publish, your default will be to deploy to a development web site.
When you are ready, you can use the Manage Deployments dialog to pull a specific version of your application to production.
Note: You can opt to share users and roles across the three deployments or create a unique security application for each. - Select Development, Test, and Production Deployments to create a deployment for development, one for test, and one for production.
Each time you publish, your default will be to deploy to a development web site.
When you are ready, you can use the Manage Deployments dialog to pull a specific version of your application to test or production.
Note: You can opt to share users and roles across the three deployments or create a unique security application for each.